Ceilings
Auto Ceiling
The system automatically searches for a closed area around the selected point and takes this area as the ceiling in the 3D scene. Usually, the function is used to build a room’s ceiling framework.
Operation:
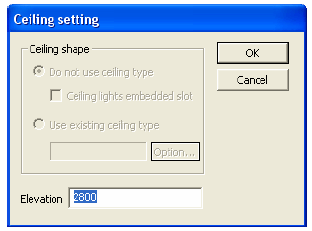
1. Select Room Auto ceiling in the menu bar.2. Move the mouse into the workspace, and you can see a tip “Specify a point inside the room”. Left-click inside the room to determine the position of the ceiling framework, and then the “Ceiling setting” dialogue pops up.3. In the dialogue box, set the elevation of the ceiling (default elevation is 2800 mm). Column, ceiling, Spotlight.
Draw ceiling
Generate ceilings with any shape at any place.Operation:
1. Select Room Draw ceiling in the menu bar.2. Move the mouse into the workspace, and you can see a tip asking you to determine the “First point”. Left click to determine it. A “Next point” tip appears, and it also dynamically displays the distance between the two points. Click on the second point. Repeat the process to determine all the nodes of the ceiling framework. Right-click to finish selecting the area, and a “Ceiling setting” dialogue pops up.
Ceiling block
Generate ceilings in the rectangle area.
Operation:
1. Select Room Ceiling block in the menu bar.2. Move the mouse into the workspace, and you can see a tip asking you to select the ceiling framework’s “First point”. Click to select the first point. Move the mouse toanother position. Then click to select the “second point”. At the same time, it dynamically displays the distance between two points. Click at a proper position to the area for the ceiling. And a “Ceiling setting” dialogue pops up.3. In the dialogue box set the elevation of the ceiling framework (default elevation is 2800 mm).
Lights
Single spotlight
Arrange ceiling lights one by one in the workplace.
Operation:
1. Select Room Spotlight in the menu bar.2. Move the mouse to the workspace, and you can see a tip asking you to select the “Position”. Left-click to select it.3. Repeat the above operations to arrange other ceiling lights.
Tip: The ceiling light is displayed as a small red dot in the workplace.
Linear spotlights
Arrange ceiling lights along a line in the workplace.
Operation:
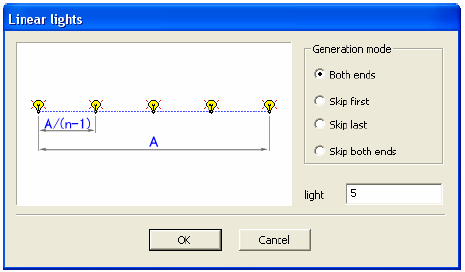
1. Select Room Linear spotlight in the menu bar.2. Move the mouse into the workspace, and you can see a tip asking you to select the “First point” of the line. Left-click to determine it.3. After you define the first point, you can see another tip asking you to select the “Second point”. At the same time, it dynamically displays the distance between two points. Left-click to select it. Then the “Linear lights” dialogue pops up. The dialogue provides four ways for arranging ceiling lights, including “Both ends” “Skip first” “Skip last” “Skip both ends”. Also, you can set the number of ceiling lights along the line (the default value is 5). After setting these parameters, press “OK”.